|
|
|||||||||||||||||||||||||||||||||||||||||||||||||||||||||||||||||||||||||||||||||||||||||||||||||||||||||||||||||||||||||||||||||||||||||||||||||||||||||||||||||||||||||||||||||||||||||||||||||||||||||||||||||||||||||
|
|
Imagine that you have a scanned image that is 2000 pixels wide. If you display this image on a computer monitor (or project the image), that can only display 1024 pixels wide, then some of these pixels have got to go somewhere. They can either be cropped or lost! You could quite easily insert this image into powerpoint and display it. Job Done! But....by doing this you're wasting PIXELS and making your files unnecessarily BIG. There are toooooo many pixels for the resolution of your computer. So what we need to do is reduce the number of pixels that are in that image. But I hear you say "Pixels = Quality". Yes, that's true but if your computer (or projector) has 1024 pixels wide and you reduce the number of pixels in our image to 1024 . . . THERE WILL BE NO LOSS OF QUALITY!
| ||||||||||||||||||||||||||||||||||||||||||||||||||||||||||||||||||||||||||||||||||||||||||||||||||||||||||||||||||||||||||||||||||||||||||||||||||||||||||||||||||||||||||||||||||||||||||||||||||||||||||||||||||||||||
What to aim for: |
|||||||||||||||||||||
| 1 | If your computer (or projector) is running at a resolution of 1024 pixels wide x 768 pixels tall, then it's no point having any images with more pixels than this. | ||||||||||||||||||||
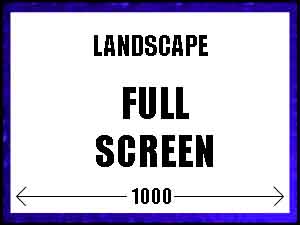
| 2 | If you are going to be displaying the image full screen,
i.e. occupying the whole page area in powerpoint, then aim for about 1000 pixels wide. Why
1000 and not 1024...it's easier to remember! Also it doesn't have to be exactly 1000
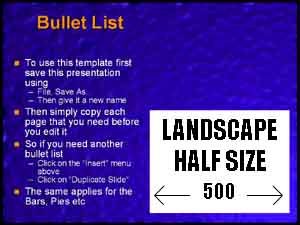
pixels, just over or just under, doesn't really matter. If you are only showing a picture that will occupy half the width of the screen then half it. e.g. aim for about 500 pixels wide. Landscape images:
|
||||||||||||||||||||
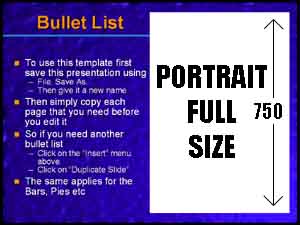
| 3 | If your particular image is "portrait" e.g. it's
taller than it is wider, then aim for an image that is about 750 pixels tall, or for a
half size image about 375 pixels tall. Portrait images:
|
||||||||||||||||||||
| 4 | If your computer is set to a different resolution:
Adjust these sizes if the image will appear smaller on the finished powerpoint "on-screen" page |
||||||||||||||||||||
Reducing the Pixels: |
|||||||||||||||||||||
| To resize your bitmap pictures use your favourite graphics software. These instructions are for Photoshop |
|||||||||||||||||||||
| 1 | Load your image into Photoshop | ||||||||||||||||||||
| 2 | Click on the "Image" menu | ||||||||||||||||||||
| 3 | Select "Image Size" and adjust the
"Width" size. The Height will adjust automatically. If the pixels numbers are grayed out then tick the "resample image" tick box. (In PaintShop Pro this is labelled "Re-size") |
||||||||||||||||||||
| 4 | Then click OK | ||||||||||||||||||||
| 5 | Save it as a .PNG (See graphic formats) | ||||||||||||||||||||
Digital Cameras |
|||||||||||||||||||||
| 1 | Most cameras have a setting for resolution. Some common ones
are 640x480, 800x600, 1024x768, 1280x960, 2048x1536 Some cameras have a quality setting, this is normally just how much .JPG "compression" to apply. Generally the more compression the more information is lost with .JPG files. |
||||||||||||||||||||
| 2 | Think pixels. Set it to 1024x768 as this is the closest to what you computer is set to. | ||||||||||||||||||||
| 3 | If you are going to be cropping the images or you cannot get close enough to the subject when you take the picture, then set the resolution to something higher, so you can still crop the image but still end up with enough pixels. | ||||||||||||||||||||
| 4 | Copy the images to your computer (see the instructions that came with your digital camera) |
||||||||||||||||||||
| 5 | Manipulate them using your graphics software, applying the same principles as "What to aim for" | ||||||||||||||||||||
| 6 | Save it as a .PNG (See graphic formats) | ||||||||||||||||||||
Powerpoint - How to insert an image |
|||||||||||||||||||||
| 1 | First load up your presentation | ||||||||||||||||||||
| 2 | Click on the "Insert" menu | ||||||||||||||||||||
| 3 | Select "Picture", "From File..." | ||||||||||||||||||||
| 4 | Navigate to where you image is located, and click on the filename. e.g. awesome-background.png | ||||||||||||||||||||
| 5 | Click "Insert" | ||||||||||||||||||||
| 6 | PowerPoint will insert the image slap bang in the middle of
the page. Sometimes it will be too big and fill the screen (This is normally caused by too many pixels in the bitmap).  If it does this then click on the page zoom button and choose a really small number. You will then be able to zoom out to see the whole image. |
||||||||||||||||||||
| 7 | To scale the image without distorting it, click and hold
with the left mouse button on any one of the corner "handles" and drag the
handle to re-size the image smaller or bigger. If you want to distort the image then click and drag any of the side "handles" |
||||||||||||||||||||
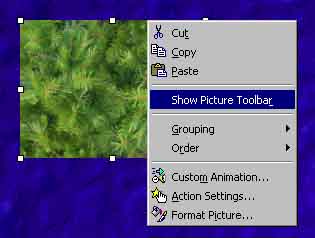
| 8 | If you want to manipulate the image further it's generally
better to do it using your graphics software, e.g. Photoshop, PaintShop pro etc. But for
some basic options you need the "Picture Toolbar". Right click the image and
choose "Show Picture Toolbar"
|
||||||||||||||||||||
| 9 | The picture toolbar: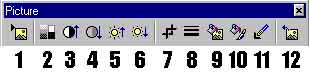 Starting from left to right:
| ||||||||||||||||||||
| 10 | By copying an image in powerpoint onto another page in the same presentation will not make your presentation filesize much bigger. So the more images you can re-use the better | ||||||||||||||||||||
| 11 | Job Done! | ||||||||||||||||||||
Powerpoint |
|||||||||||||||||||||
| 1 | Load the massive presentation | ||||||||||||||||||||
| 2 | Make sure you're on the slide view | ||||||||||||||||||||
| 3 | Press the PageDown (PgDn) key to advance through the presentation one slide at a time | ||||||||||||||||||||
| 4 | If you notice one particular bitmap/picture/image takes a
fraction of a second to display, then chances are this is the offending item. It's got TOO
MANY PIXELS in it. To make doubly sure this is the offending item. Display the
"picture toolbar" and "Reset" the bitmap to its original size. If the
bitmap is guilty it will reveal itself by growing to an enormous size, most probably off
the page! |
||||||||||||||||||||
| 5 | First of all you need to get that bitmap out of powerpoint at the best quality, before we reduce the number of pixels in it | ||||||||||||||||||||
| 6 | a) Select the image b) Copy it to the clipboard c) Load up Microsoft Photo Editor (You may have to install it from the original powerpoint or Office CD) d) Click the "Edit" menu and click "Paste" e) Save it as a .PNG (see graphic formats) |
||||||||||||||||||||
| 7 | Load up your favourite graphics software, Photoshop, PaintShop pro etc. Open the bitmap you saved using MS Photo Editor. Select the menu that displays how many pixels the image contains (info, image size etc) You will probably find that it contains lots and lots of pixels. ie. more than 600 (See Reducing the Pixels) |
||||||||||||||||||||
| 8 | Select the menu that will change the image size (re-size,
re-sample, image size or similar) And make the number of pixels the correct amount. (See What to Aim for) |
||||||||||||||||||||
| 9 | To make the presentation even small consider changing the
bitmaps to 256 colors (see changing the pictures to 256 colors) |
||||||||||||||||||||
| 10 | Save it as a .PNG (see graphic formats) | ||||||||||||||||||||
Scanning: |
|||||||||||||||||||||
| Because we cannot show all the different scanning software screens. We'll tell you about it. | |||||||||||||||||||||
| 1 | Put your photo/image etc on the scanner and do a preview using your scanning software | ||||||||||||||||||||
| 2 | On most scanning software there is normally an option called resolution or Dots Per Inch/DPI. If you are lucky it will also show you how many PIXELS the image will contains | ||||||||||||||||||||
| 3 | If your scanning software does not show you how many pixels the scan will be then you'll have to get the ruler out and do some basic maths | ||||||||||||||||||||
| 4 | Before you scan it you need to adjust the "Resolution" or "DPI". As you adjust it hopefully the number of pixels displayed will also change | ||||||||||||||||||||
| 5 | Another bit of theory. Lets say our original image on the
scanner is 5 inches wide. We want to end up with an image about 1000 pixels wide, as we
are going to fill the powerpoint screen with our scanned image If we set the scanner to scan at 300 DPI (Think of it as Pixels Per Inch!) we will end up with a bitmap image that is 1500 pixels wide. Too many. ( 5 x 300 = 1500) (Physical size x DPI = pixels) |
||||||||||||||||||||
| 6 | So set the scanner at 200 DPI. So for every inch we will end
up with 200 pixels. (5 x 200 = 1000) |
||||||||||||||||||||
| 7 | Draw around the image you require | ||||||||||||||||||||
| 8 | Scan it We should end up with an image that is 1000 pixels wide. Great for a full screen landscape image. Tip: It's always better to scan the image at the correct pixel size in the first place, as re-sizing the image (especially bigger) will produce bad results |
||||||||||||||||||||
| 9 | Save it as a .PNG (see graphic formats) | ||||||||||||||||||||
Colour / Color |
|||||||||||||||||||||
| In the beginning there was only black & white. Then came 4 colors. Then there was 16 colors. Then 256 colors. Then 16,000 colors, Then 64,000 colors. Then 16 million colors. Then even more colors than the eye can see. | |||||||||||||||||||||
| 1 | It's the same rules as pixels really. See what your computer
is set to, then make your images the same. To see what your computer is set to by using
the same method as finding out the resolution. (Click here if
you missed it)
|
||||||||||||||||||||
| 2 | So if your computer is set to 16 bit color (the most common setting). Then reduce the number of colors in your images to the same number of colors. As you will not gain any quality advantage by having more colors in your images than the computer or projector can display. | ||||||||||||||||||||
| Or you can take it a lot further... If filesize is crucial to your presentations then read on... |
|||||||||||||||||||||
Change the pictures to use 256 colors.Commonly called "Indexed" or "8 bit" color |
|||||||||||||||||||||
| Reducing your graphics to use less colors will dramatically
reduce the filesizes: We've had them reduced to 10% of their original size, but typically 40% And you will probably not notice any difference to the look of the images in powerpoint. It also speeds everything up, from display images with wipes, to loading and saving |
|||||||||||||||||||||
| 1 | Using Photoshop (or similar) open your image | ||||||||||||||||||||
| 2 | Click on "Image" | ||||||||||||||||||||
| 3 | Select "Mode", "Indexed color" and a
menu will pop up. Make sure the Palette is set to "Adaptive", this makes Photoshop choose a set of 256 colors to best represent your image, so if your image is predominately red, then it will choose a nice set of red colors based on your image. 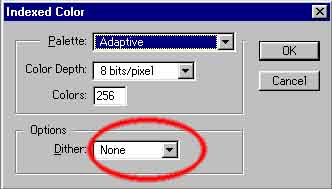 (In PaintShop Pro, this is under "Decrease color depth - 256 colors". Make sure the Palette is set to optimised) |
||||||||||||||||||||
| 4 | Click "OK" and see what your image looks like. If it looks acceptable then save it as a .PNG (see graphic formats) |
||||||||||||||||||||
| 5 | If the original picture contained lots of the same color
e.g. a graduated blue, then probably the image now looks awful. Click on the
"Edit" menu and choose "Undo" Repeat from step 2, but this time
change the "Dither" option to "Diffusion" and Click "OK" Save it as a .PNG (see graphic formats) |
||||||||||||||||||||
Graphic File Formats |
|||||||||||||||||||||
| There's loads of them. We'll concentrate on the main ones. BMP.JPG.PNG.GIF | |||||||||||||||||||||
| .PNG - Portable Network Graphic - Our Favourite for powerpoint. The BEST! - Does not lose any information - Works with all the different numbers of colors (256, 16 bit, 24 bit, grayscale) - A Compressed file (smaller filesize, especially 256 color files) - Widely compatible - Takes very little time to de-compress in powerpoint |
|||||||||||||||||||||
| .JPG - Joint Photographic
Expert Group (Pronounced JAYPEG) - OK for powerpoint (even better for email and websites!) - Loses information. But you do have control when you save it how much information is lost - Only works with 24 bit colors (16 million) - A highly compressed file (very small files) - Widely compatible - Takes longer to de-compress in powerpoint than .PNGs - Also puts a higher load onto the processor to de-compress |
|||||||||||||||||||||
| .BMP - Windows Bitmap - OK for powerpoint (even better for windows wallpaper!) - Does not lose any information - Works with all the different number of colors - Can be compressed but not 24 bit colors. Very BIG files - Widely compatible - Very fast to load and display in powerpoint |
|||||||||||||||||||||
| .GIF - Graphics Interchange Format - OK for powerpoint (even better for web pages) - Loses information as it can only have a maximum of 256 colors - Only works with 256 colors - Compressed format - Widely compatible - Doesn't take anytime to de-compress as it's not compressed |
|||||||||||||||||||||
| Note: Although we recommend .PNG files throughout this tutorial, you can of course use any. We use .PNG because....well because....WE JUST DO - ALRIGHT! | |||||||||||||||||||||
Download free awesome backgrounds for powerpoint
| |||||||||||||||||||||
The following assumptions were made for this tutorial:

| filename | size | comments |
| coffee1.png | 233KB | (16m color bitmap) 24 bit. Taken with a digital camera |
| coffee2.png | 100KB | (256 color dithered bitmap) Reduced to 256 colors |
| graphics.ppt | 497KB | (contains both coffee1 & coffee2) So you can compare the quality |
| readme.txt | 1KB | Some important info regarding the files |
both coffee graphics files are the same 600 pixels tall.
When powerpoint saves a presentation with just the coffee2.png in the filesize is 263KB
When powerpoint saves a presentation with just the coffee1.png in the filesize is 397KB
That's a third improvement in filesize for no improvement in quality
See the new awesome backgrounds for powerpoint

| Home | Products | More Info | Order | Contact | PowerPoint Tips | Site Map |