Tutorial about the transparency options in powerpoint graphics and bitmaps for on-screen presentations
This tutorial guides you through how to achieve transparent graphics in PowerPoint® presentations.
It's great for:

- Removing that annoying white rectangle around your logo
- Achieving effects you didn't know were possible
- And generally making your presentation look more professional
- FREE Downloadable files available at the end to see the finished results
- This is THE original powerpoint transparency tutorial - often imitated but never bettered
- Download the printable pdf of this ppt transparent tutorial

Theory:
You can insert most types of graphic files into powerpoint.
- This tutorial deals with the type of graphics commonly called "bitmaps". These graphic files are all made up of dots. They can come from all sorts of places, digital camera, scanners, photo libraries and paint packages
- The other sort of graphic files are "vector" graphics, these commonly come from powerpoint clip-art or Corel Draw clip-art. This tutorial is not for this type of graphic
The tutorial covers both Photoshop and Paint Shop Pro as the graphics editor. But don't be put off by this, the principle is the same no matter what graphics software you use. It works with all the common graphics software such as:
- Photoshop
- Paint Shop Pro
- Corel PhotoPaint
Transparency - What is transparency?:
When you insert any type of bitmap graphic into powerpoint there are always four sides to the image. Sometimes you just want to see your logo or graphic without the background being visible. With transparency you can achieve this.
Powerpoint has two methods of using transparency:
- Method one (the easy one!) is to use powerpoint's inbuilt transparency icon.
- Method two (the complicated one) is to include the transparency information (Alpha channels) into the graphic file before it is imported into power point
Sounds complicated? Then follow this step by step tutorial:
Quick Links:
Method One
Method Two
Step by Step Tutorial:
|
|
| 1 |
In powerpoint, import your picture from a file, choose "Insert", "Picture", "From File" |
| 2 |
PowerPoint will insert the image in the middle of the page.
 |
| 3 |
Right click the image and choose "show picture toolbar", the following toolbar will appear:
 Click the transparency button, number 13 on our list |
| 4 |
Your pointer will now look like the transparency button itself. Click an area of the image that you want to make disappear. In this case we clicked on the slightly off white area around our logo.
|
| 5 |
Job done!
 |
| 6 |
If on closer inspection, the image has some unwanted artifacts (furry edges!), around the image then continue to part two . . .
 |
Method One:
The easy way - Part 2
|
| The unwanted artifacts are a result of something called "anti-aliasing". Anti-aliasing is a clever technique to make bitmaps appear smoother to the eye, than they really are. Which in most cases is fine, but in this case the anti-alias effect is smoothing to a background color of white. Our presentation has a background color of blue. So we need to make the image have a similar blue background to our powerpoint background before we insert it into power point. |
| 1 |
Load your image into photoshop or paint shop pro or your favorite graphics package (pixel basher) |
| 2a |
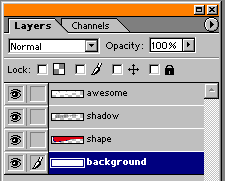
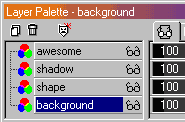
If the image is layered then simply select the background layer.
Then go to step 3
  |
| 2b |
If the image is not layered then you need to select the white background using whatever methods you are comfortable with. We tend to use the "Magic Wand Tool" to select areas of similar color. Just select the tool and click in the area you want to select.
  In Photoshop we set the tolerance setting to 1 and the anti-alias option was turned ON in photoshop.
In Paint Shop Pro we set the tolerance setting to 100 and the feather to 0.

Once you have the area selected you need to fill this area with a blue color . . . |
| 3 |
How do you decide what shade of blue to use?
The blue needs to match the overall, or predominant, background color in powerpoint. In photoshop or paint shop pro make your foreground color the blue you need.

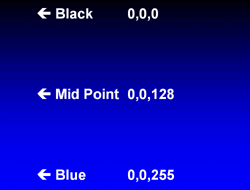
eg. if your background fades from black (red,green,blue=0,0,0) to blue (rgb=0,0,255), then make your background color a midpoint between the two values (rgb=0,0,128). If your logo or bitmap graphic is going to go in the bottom right corner, then obviously make the blue as close to this color as possible. In this case it would need to be about 0,0,240.
 
One way of finding the exact blue is to display your presentation in powerpoint as a slideshow, do a screengrab with the "Print screen" key, then paste this image into photoshop or paint shop pro, then use the "Eyedropper" tool to find out what the color is. |
| 4 |
To fill the area with blue color:
Photoshop: Choose "Edit", "Fill" and make sure "foreground color" is selected and 100% opacity. Click "OK" to fill the selected area
Paint Shop Pro:
Use the "Flood Fill" tool, with these settings. Tolerance = 200, Opacity = 100
 It should now look like this
 |
| 5 |
Save the image as a .png or .tif file (do not use .JPG). Flatten or Merge the image before saving if you still have more than one layer. |
| 6 |
The image is now ready for importing into powerpoint.
Repeat steps 1 through 5 of Part One above.
 This time around any artifacts will be minimal. |
The following assumptions were made for this tutorial:
- You are using powerpoint 97 or above. For powerpoint 2000 and XP the principle is the same except some of the menus will look slightly different
- Photoshop 6.0 and Paint Shop Pro 7.0 was used
- All your presentations should have the page size set to "on-screen"
- This tutorial is best for "on-screen" presentations and not printed presentations
To download the files used in this tutorial right click the image below, then choose "Save target as" (IE), or "Save Link As" (Netscape).

- The file downloaded is a Zipped file which will need unzipping.
- It contains a good example of this tutorial. Filesize 0.6mb
Have Fun!
Please Note: Although we have made every effort to check the files against viruses at all stages of production. It is always wise to run a virus checker on any software before running it. By Default! cannot accept responsibility for any loss, disruption or damage to your data or computer system which may occur while using either either the CD-Rom or downloaded files. It is assumed that by downloading the files you accept these conditions. Otherwise do not use the awesome backgrounds for powerpoint.
See the new awesome backgrounds for powerpoint
|